Blaze Masters
Educational Forest Management Simulator developed in collaboration with Utah Department of Forestry, Fire, and State Lands
Contributions
-
Served as Scrum Master and utilized Trello to keep the 5 person team on pace
-
Led project pitch and One-Sheet design, coordinated with forest management agencies for consultation, led research for educational aspects of the game
-
Mediated an intense conflict within the team and persuaded all parties to commit to a unified team effort
-
Co-designed and iterated on Survey, Cut, Plant, and Extinguish mechanics
-
Pitched in with QA, Audio, and Writing efforts
-
Tools: Unity, Github, Trello
-
Platforms: PC, iOS
-
Team: 5 people
Cody Cottrell
Game Designer
Contributions
-
Represent Level Design department at all sprint, milestone, & retrospective meetings; assign tasks to junior LD in Coda
-
Identify pipeline inefficiencies & risks & offer solutions
-
Be a bridge between design, programming, & art teams; responsible for communicating Creative Director’s narrative vision within relevant contexts for cross-functional disciplines
-
Solely responsible for designing, developing, iterating, & documenting over 60% of playable areas within project scope
-
Design, script, & implement objectives, puzzles, & micro-stories
-
Apply stakeholder critiques & playtester feedback to relentlessly iterate engaging, atmospheric, readable blockouts
-
Mentor a junior level designer in tools, methods, & metrics
-
Navigate challenges of rapidly growing company, an engine change, & shifts in creative vision
Poppy Playtime:
Chapter 4
Puzzle-based Survival-Horror inspired by titles like Resident Evil and Alien: Isolation
-
Tools: Unreal Engine 5, Perforce, JIRA, Confluence, Miro, DungeonDraft
-
Platforms: PC, PlayStation, Xbox, Switch
-
Dev Time: 2/24 - 01/25
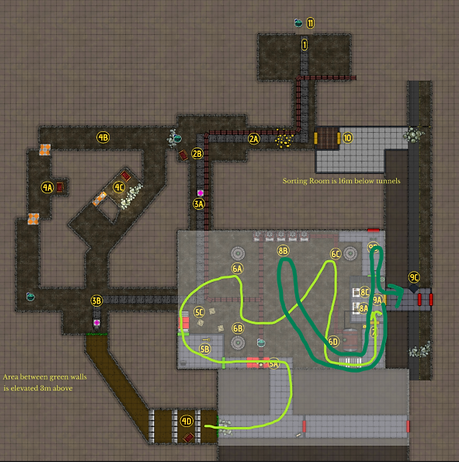
Level Walkthrough:
Foundation
Level Goals
-
Fulfill the narrative objective of creating a makeshift bomb in the factory's foundation by combining mining charges and "red smoke" gas flow.
-
Create a slow-paced environment that builds tension before setting the game's climax into motion.
-
Challenge players with the game's ultimate puzzle, utilizing gas flow-control mechanics.
Main Design Skills Used
-
Atmospheric foreshadowing
-
Navigational cues
-
Contextual combat triggers and encounter escalation
-
Puzzle readability and feedback
Level Flow Breakdown
Section 1 - Introductory Area (0:00 - 0:57 in video)
Showcase explosive pickups and hint at where to find more

-
Atmospheric foreshadowing
-
Framing of elevator and cave-in event preview how players will need to exit the level.
-
The critter that jumps through the hole into Section 2 foreshadows the enemy presence in that area.
-
-
Navigational cues
-
The visibility to the other side of the hole that the critter jumped in hints that there's more to explore on that side.
-
The minecart tracks draw players into Section 2 even as they temporarily enter the wide open space of Section 3.
-
Section 2 - Obstacle 1 Area (0:58 - 3:04 in video)
Challenge players with discovering all explosive pickups in an escalating combat environment

-
Atmospheric foreshadowing
-
The critter at the end of the entry hall hints at an explosive location when it scurries down the hall to the right.
-
-
Navigational cues
-
The affordance created by the pullable jump pad hints at the explosive in the elevated tunnel.
-
-
Contextual combat triggers and encounter escalation
-
A few enemies spawn upon entering the section to reinforce that it is dangerous.
-
Following the foreshadowing critter into the west-most tunnel, players contextually trigger more critters to spawn when they pick up the explosives that are there. This provides both a jump scare and a sense that the player is affecting the world.
-
The west tunnel spawn points naturally push players to the north tunnel, where they will cross a trigger to spawn more enemies from both ends of the tunnel, escalating the encounter's intensity.
-
The north tunnel leads players to the east tunnel, where focused lighting and a tutorial prompt ensure that players will discover the third explosive pickup's location in an isolated cove. Picking up the explosives triggered a burst of contextual spawning so that when players exit the isolated cove, the combat encounter escalates to its highest intensity.
-
With enemies now approaching from nearly all directions, the player is naturally pressured to escape by either using the pullable jump pad to get into the elevated south tunnel or by sprinting out the entrance tunnel. Both routes take the player to the main room where they'll have to plant the explosives they've collected. Already spawned enemies will follow into the main room but are a significantly reduced threat in the more open and brightly lit space.
-
Section 3 - Obstacle 2 Area (3:05 - 7:54 in video)
Challenge players with the game's ultimate puzzle and set the story's climax into motion

-
Atmospheric foreshadowing
-
The critter that scurries on the overhead pipe by the swing handle foreshadows their mass emergence later.
-
-
Navigational cues
-
The foreman's office route where the control room keycard is found loops into the Section 2 tunnels and vice versa so that players can exercise a sense of choice without losing focus on the explosive-collection objective.
-
The control room is locked by default and gas flow to the area is shut off by default, guiding the player to explore Section 2 in search of the explosives even if they choose to check out Section 3 when they first pass through.
-
The control room directly overlooks the gas pipe puzzle so that it's clear where the "manual routing" takes place after activating gas flow on the control console.
-
After the gas puzzle is complete, the exit door begins malfunctioning and a Power Cable running from the door to its corresponding gear box on the roof of the building visually activates, guiding players to the area's final obstacle.
-
-
Puzzle readability and feedback
-
Elements that reinforce the high-level puzzle solution:
-
Blatant pickup note taped to the control console screen directly discusses the explosive nature of combining accelerants A, B, and C.
-
Environmental posters in the control room and around the pipe puzzle visually warn of the danger in combining all three accelerants.
-
-
Elements that reinforce how the puzzle mechanics work:
-
After activating gas flow, the gas is visible in the first pipe's window but blocked by a Flow Seal, which players have used earlier in the game. Disengaging the flow seal allows the gas to progress and fill succeeding pipes; the directional panning effect of the gas material in each pipe's window clearly highlights the one-way nature of gas flow in this pipe system.
-
The interactive lever on each Junction Box literally points in the direction of gas flow, reinforced by sealed off pipes losing the gas material in their windows and pipes within the Junction Box's route filling with said gas material.
-
-
Elements that help guide players to the solution:
-
The fact that Accelerant Mixers are the only gas-flow mechanic players haven't previously encountered automatically highlights them as special, even if players ignore the pickup note and environmental posters.
-
The "ABC" naming convention of the accelerants paired with the default visual pathing of the pipes (A, C, wait, where's B?) primes players for the possibility that the puzzle solution isn't the obvious ABC order.
-
Wires hanging from the pipes attached to Accelerant Mixer B draw the eye up to its overhead location.
-
"Red herring" pipes that lead gas away from the storage tank are all color-coded differently than the pipes that matter.
-
Beginning the puzzle with a Flow Seal primes players for the bookend Flow Seal that's necessary to actually trap gas in the Storage Tank where it can serve its role in the makeshift bomb required by the narrative.
-
-
Elements that provide feedback on progress toward the solution:
-
Accelerant Mixers provide both audio and visual feedback when gas first flows through them, reinforcing that they are affecting the gas flow.
-
The gas visually changes color when routed through Accelerant Mixers in the correct order.
-
The pressure sound effects and the status light on the Storage Tank provide feedback when gas flow has reached the tank. The status light changes from white to yellow to indicate danger when the explosive BCA accelerant combination is present.
-
Trapping the BCA combination in the Storage Tank by engaging the Flow Seal at the end turns the status light red, triggers and alarm, and visually activates a Power Cable leading from the Storage Tank to the control console, guiding players to where they must go to release the explosive gas and complete the puzzle.
-
-
Section 4 - Escape Area (7:55 - 9:20 in video)
Ramp up the tension and funnel players to the next big narrative beat

-
Navigational cues
-
The exit path is totally linear with a drop that prevents backtracking and enemy pressure that pushes players toward the exit elevator.
-
The cave-in event from Section 1 prevents players from wandering after reaching the top of the elevator.
-
-
Contextual combat triggers and encounter escalation
-
Having to call and wait for the elevator gives the final rush of enemies an intense "last stand" feeling.
-
Main Lesson Learned
-
Linear objective sequences require special consideration in non-linear environments.
-
The level would have felt more polished if players couldn't interact with the gas control console before they were supposed to. Just making it non-interactive until all the explosives are planted was a weak solution.
-
That said, without contriving a way for the explosives to be keys to a gated control console, some level of non-diegetic rule-keeping is necessary to prevent softlocks.
-
For an improved flow, I would:
-
Place the keycard (5B) with Section 2's east tunnel explosive (4C) and have it open a locked door back to the tunnel junction (3B).
-
Have a main gate to the Section 2 tunnels close upon entering with the mobile jump pad so that players can only take the elevated south tunnel (4D) out and therefore must have encountered every explosive before they're able to reach the gas control room (7) with the keycard.
-
-